Free shipping £150+ Orders
Glycolic Acid Peel Before After Transformations
The change you can see from a glycolic acid peel before and after is genuinely impressive. It’s all down to a chemical exfoliation process that gets rid of the 'glue' holding old, dead skin cells together, letting smoother, brighter skin shine through. The main perks are a refined texture, fewer fine lines, and a much more even skin tone. Think of this guide as your complete roadmap to getting that sought-after post-peel glow.
Your Guide to Glycolic Acid Peel Transformations
Starting your journey with a glycolic acid peel is a bit like renovating a room. You wouldn't just slap on a new coat of paint, would you? You prep the walls, apply the treatment carefully, and then look after the new finish so it lasts. A glycolic peel follows the same logic—it’s a structured process designed to give your skin's surface a fresh start, revealing the healthier, more vibrant layer just underneath.
This potent Alpha Hydroxy Acid (AHA) works by gently dissolving the bonds that keep dead skin cells clinging to your epidermis. By clearing away this dull, outer layer, the peel kick-starts cell turnover and encourages fresh, new skin to come to the surface. The payoff is a visible improvement in a whole host of common skin concerns.
What Can You Realistically Expect?
Knowing the potential outcomes is key to setting the right expectations. A series of peels can bring about some pretty significant visual changes, which is a big reason why they're so popular. Here are the main benefits you can look forward to:
- Smoother Skin Texture: By sloughing off all those rough, dead cells, the peel leaves your skin feeling noticeably softer to the touch.
- Reduced Fine Lines: It gives collagen production a nudge, which helps to plump up the skin and soften the look of fine lines over time.
- More Even Skin Tone: Many people ask about pigmentation, and a major plus is how glycolic acid helps to lighten skin by fading dark spots and old acne marks.
- Brighter Complexion: Getting rid of that dull top layer instantly uncovers a more radiant, luminous glow.
Think of a glycolic acid peel as hitting the reset button on your complexion. It's a controlled renewal process that tackles surface-level issues to bring out your skin's natural vitality.
To give you a clearer picture, here's a quick rundown of the entire process from start to finish.
Glycolic Acid Peel At a Glance
This table breaks down each stage, so you know exactly what’s happening and when.
| Stage | What Happens | Typical Duration | Key Outcome |
|---|---|---|---|
| Preparation | Stop using exfoliants; prep skin with gentle products. | 1-2 weeks before | Minimise irritation and prime the skin for the peel. |
| During the Peel | A professional applies the acid for a short period. | 5-10 minutes | The acid dissolves bonds between dead skin cells. |
| Immediate Aftercare | Skin may be red and sensitive; focus on hydration. | 24-48 hours | Soothe the skin and begin the healing process. |
| The Peeling Phase | Light flaking or peeling occurs as old skin sheds. | 3-7 days post-peel | The dull, damaged outer layer is removed. |
| Long-Term Results | With a series of peels, collagen is stimulated. | 4-6 sessions | Noticeably improved texture, tone, and radiance. |
This timeline shows how the benefits build up, leading to lasting improvements.
Growing Popularity and Proven Results
This treatment isn’t just a passing fad; its effectiveness is backed by a growing number of people who have seen real, tangible results. In the United Kingdom, for instance, demand for this procedure has shot up. Dermatology clinics have reported a 35% increase in glycolic acid peel procedures between 2019 and 2024.
Even better, over 60% of patients noticed visible improvements in their skin's clarity and a reduction in fine lines after just four to six sessions. This guide will walk you through every step, from prepping your skin for the treatment to navigating the healing process, making sure you feel confident and informed on your path to brilliant skin.
How to Prepare Your Skin for a Glycolic Peel

To get those brilliant glycolic acid peel before after results you're after, the real work starts long before you arrive for your appointment. Think of it like priming a canvas before painting; the prep work is just as crucial as the main event itself. Getting your skin ready properly helps the glycolic acid to penetrate evenly and do its job effectively, all while minimising the chance of irritation.
This pre-peel phase is all about building up your skin's natural defences and getting it into a calm, well-hydrated state. When your skin is properly prepped, you're not just setting the stage for a better result, but also for a much smoother and more comfortable recovery.
One to Two Weeks Before Your Peel
In the week or two leading up to your treatment, your main job is to dial down anything that could make your skin sensitive. That means taking a temporary break from certain products and treatments that could make your skin more reactive.
Products to Stop Using (5-7 Days Prior):
- Retinoids: Park your prescription tretinoin and over-the-counter retinol or retinal for now. These fantastic ingredients speed up cell turnover, but that also makes your skin more sensitive to a peel.
- Other AHAs and BHAs: You'll want to pause other exfoliants like salicylic acid, lactic acid, and even other at-home glycolic acid products. The last thing you want is to over-exfoliate your skin right before a professional treatment.
- Harsh Scrubs: Physical exfoliants can create tiny micro-tears in the skin's surface, so it's best to put them aside.
- Vitamin C Serums: While brilliant for overall skin health, some high-potency Vitamin C formulas can be quite acidic. It's wise to pause them just before your peel to avoid any potential reactivity.
Beyond your product shelf, you’ll also need to be mindful of hair removal and sun exposure.
- Avoid Waxing and Depilatory Creams: Don't wax, thread, or use any hair removal creams on the area being treated for at least a week beforehand.
- Stay Out of the Sun: This is a big one. Sunburnt skin absolutely cannot be treated. You need to avoid direct sun exposure and tanning beds for at least two weeks before your appointment. Sun damage compromises your skin barrier, which makes a peel unsafe.
Your Pre-Peel Skincare Routine
Now that we've covered the "don'ts," let's focus on what you should be doing. Your routine needs to become simple, gentle, and laser-focused on hydration and protection.
A minimalist approach really is your best friend here. Your skin needs to be calm and resilient to get the most out of the peel. This is the time to coddle your skin barrier, not challenge it.
"Think of your skin barrier as a brick wall. In the weeks before a peel, your job is to reinforce that wall with hydrating, soothing ingredients. A strong barrier means a safer peel and a faster recovery."
To get there, your daily routine should boil down to three key steps.
- Gentle Cleansing: Switch to a mild, soap-free cleanser that won’t strip your skin of its natural oils. It's really important to use a product designed to prepare your skin for a treatment. You can find out more about what makes a great pre-peel cleanser that gets rid of impurities without causing irritation.
- Consistent Hydration: Moisturise, moisturise, moisturise. Use a simple, fragrance-free moisturiser packed with ingredients like ceramides, hyaluronic acid, or glycerin. Keeping your skin deeply hydrated helps the peel to work more predictably and significantly aids the healing process afterwards.
- Diligent Sun Protection: This is completely non-negotiable. Every single morning, apply a broad-spectrum sunscreen with at least SPF 30—even on cloudy days. Shielding your skin from UV damage is the single most important thing you can do to prevent complications like post-inflammatory hyperpigmentation.
By following these simple prep steps, you create the perfect conditions for a successful treatment and set yourself up for that smooth, radiant skin you're aiming for.
So, What Actually Happens During a Glycolic Peel?
Walking into the treatment room can be a bit intimidating if you don't know what's coming. Let's pull back the curtain on what a professional glycolic peel actually involves, because knowing the process can make all the difference. Honestly, it’s a surprisingly quick and methodical treatment. Think of it less like a serious medical procedure and more like a super-charged facial that gets straight to the point.
From the moment you're settled in, a skilled aesthetician or dermatologist takes over. Their focus is on applying the peel safely and effectively, and they'll be checking in with you the entire time to make sure you're comfortable. The whole point is to get that perfect level of exfoliation without pushing your skin too far.
The Step-by-Step Procedure
While every clinic has its own slight variations, the core steps of a professional glycolic peel are pretty standard. The whole thing is usually done and dusted in under 30 minutes.
-
A Proper Cleanse: First things first, your skin needs to be squeaky clean. Your practitioner will meticulously remove every trace of makeup, oil, and daily grime. This isn't just a quick wipe-down; it's a crucial step to make sure the peel goes on evenly and you get those amazing glycolic acid peel before after results you're looking for.
-
Prepping the Skin: After cleansing, they’ll often apply a prep solution. This usually feels a bit astringent (think an alcohol or acetone-based toner) and its job is to completely de-grease the skin, creating the perfect blank canvas.
-
Applying the Glycolic Acid: This is the moment it all happens. Using a soft fan brush or a cotton pad, the practitioner will apply the glycolic acid solution across your face. They move quickly and deliberately, typically starting with the tougher areas like your forehead before carefully working their way to the more sensitive spots around your nose and mouth.
What Does the Peel Feel Like?
As soon as the solution touches your skin, it gets to work. Most people feel a tingle, a bit of an itch, or a definite sense of warmth spreading across their face. A good way to describe it is "spicy" – you can absolutely feel it, but it’s rarely painful.
That active, tingling sensation is a good thing! It means the glycolic acid is successfully dissolving the glue that holds dead skin cells together. Your practitioner will be keeping a close eye on you and your skin's reaction during the 2-7 minutes the peel is active.
This is the "work" part of the skin workout. It's temporary and a clear sign that the exfoliation is in full swing. Don't be surprised if your skin looks a bit flushed or pink during this stage; that's just a normal reaction called erythema.
Neutralising and Calming Everything Down
What goes on must come off, and this "cool-down" phase is just as important as the peel itself. Once your time is up, the practitioner applies a neutralising solution.
- Stopping the Action: This is usually a simple sodium bicarbonate solution that instantly halts the acid's exfoliating process. You might feel a brief warming or even a slight fizzing sensation as it works.
- A Cool Rinse: Next, your face is rinsed with cool water to get rid of any leftover product. This brings immediate relief from that spicy, tingling feeling.
- Post-Peel TLC: The final step is all about soothing and hydrating your skin. This usually involves a calming serum (maybe with some hyaluronic acid), a rich moisturiser, and the most critical product of all: a high-SPF, broad-spectrum sunscreen to shield your fresh, vulnerable skin.
By understanding exactly what happens, you can walk into your appointment feeling prepared and relaxed. You'll know what each sensation means and can look forward to walking out with the groundwork laid for a seriously radiant complexion.
Navigating Your Week-by-Week Healing Journey
The real magic of a glycolic peel doesn’t happen in the treatment room—it unfolds in the days that follow. This is the healing phase, where your skin meticulously sheds its dull, tired surface to reveal the fresh, glowing complexion hiding underneath. Knowing what to expect makes all the difference, helping you stay calm and get the best possible results.
Think of your post-peel skin like a brand new leaf—it's delicate, sensitive, and needs a bit of nurturing as it adjusts to the world. Your aftercare routine isn't just a list of suggestions; it’s the crucial support system that protects your investment and ensures a beautiful, complication-free outcome.
This visual timeline gives you a snapshot of what your skin will feel, from that initial active tingle right through to the final, soothing stage.

As the infographic shows, that active, tingling sensation is short-lived. It quickly gives way to a lovely, calm feeling once your post-peel products are applied.
Your Day-by-Day Recovery Guide
Feeling confident during your skin's healing process is much easier when you know what's coming. While everyone's experience can differ slightly depending on the peel's strength and their skin's unique sensitivity, this is what a typical recovery looks like after a professional-grade glycolic peel.
Days 1-2: The Calm Before the Shed
Right after your peel, your skin will probably look a bit pink or reddish, much like a mild sunburn. It might also feel tight and a little tender. Don't worry, this is a completely normal inflammatory response.
Your job during these first couple of days is to be incredibly gentle. That means hands off! Avoid touching your face more than necessary and stick to a very basic routine. Beneath the surface, your skin is working hard, getting ready to let go of those old cells.
"For the first 24-48 hours, treat your skin like you would a sunburn. Keep it cool, keep it hydrated, and above all, keep it protected. This initial phase really sets the tone for your entire healing process."
Days 3-4: The Flaking Begins
This is when the visible action starts. You'll likely notice some light flaking or peeling, which often begins around the mouth and nose before gradually moving outwards.
Now, this is absolutely crucial: you must not pick, pull, or scrub at the flaking skin. I can't stress this enough. Interfering can lead to scarring and post-inflammatory hyperpigmentation, completely undoing the wonderful benefits you’re after. Just let your skin do its thing.
Days 5-7: The Big Reveal
By day five, the most intense peeling usually starts to settle down, though you might have some minor shedding for another day or two. As that old skin makes its exit, you'll begin to see the smoother, brighter skin you’ve been waiting for.
Your skin is still sensitive at this point, so keep up with that gentle aftercare. By the end of the first week, most of the peeling should be finished, leaving you with a complexion that looks and feels noticeably better.
Your Essential Post-Peel Aftercare Plan
A solid aftercare routine isn't optional—it's non-negotiable. It's what supports healing, minimises side effects, and protects your brand-new skin. The plan should be simple, focusing on three core pillars: gentle cleansing, intense hydration, and strict sun protection.
-
Gentle Cleansing: Wash your face with lukewarm water and a mild, soap-free, pH-balanced cleanser. Steer clear of hot water, which can strip your skin and cause more irritation. When you’re done, gently pat your face dry with a soft, clean towel. No rubbing!
-
Intense Hydration: Your skin is going to feel tight and thirsty, so now is the time to load up on barrier-repairing moisturisers and hydrating serums. Using a post-peel moisturising hyaluronic serum can be a real game-changer here; hyaluronic acid is a superstar at drawing moisture into the skin without causing irritation. Also look for moisturisers with ceramides and peptides to help rebuild your skin’s protective barrier.
-
Sun Protection (The Golden Rule): This is the single most important step. Your new skin is incredibly vulnerable to UV damage. You must apply a broad-spectrum sunscreen with an SPF of 30 or higher every single day. Yes, even if you’re indoors or it’s cloudy. If you're outside, reapply it every two hours. This one step is your best defence against developing new pigmentation and protecting your fantastic results.
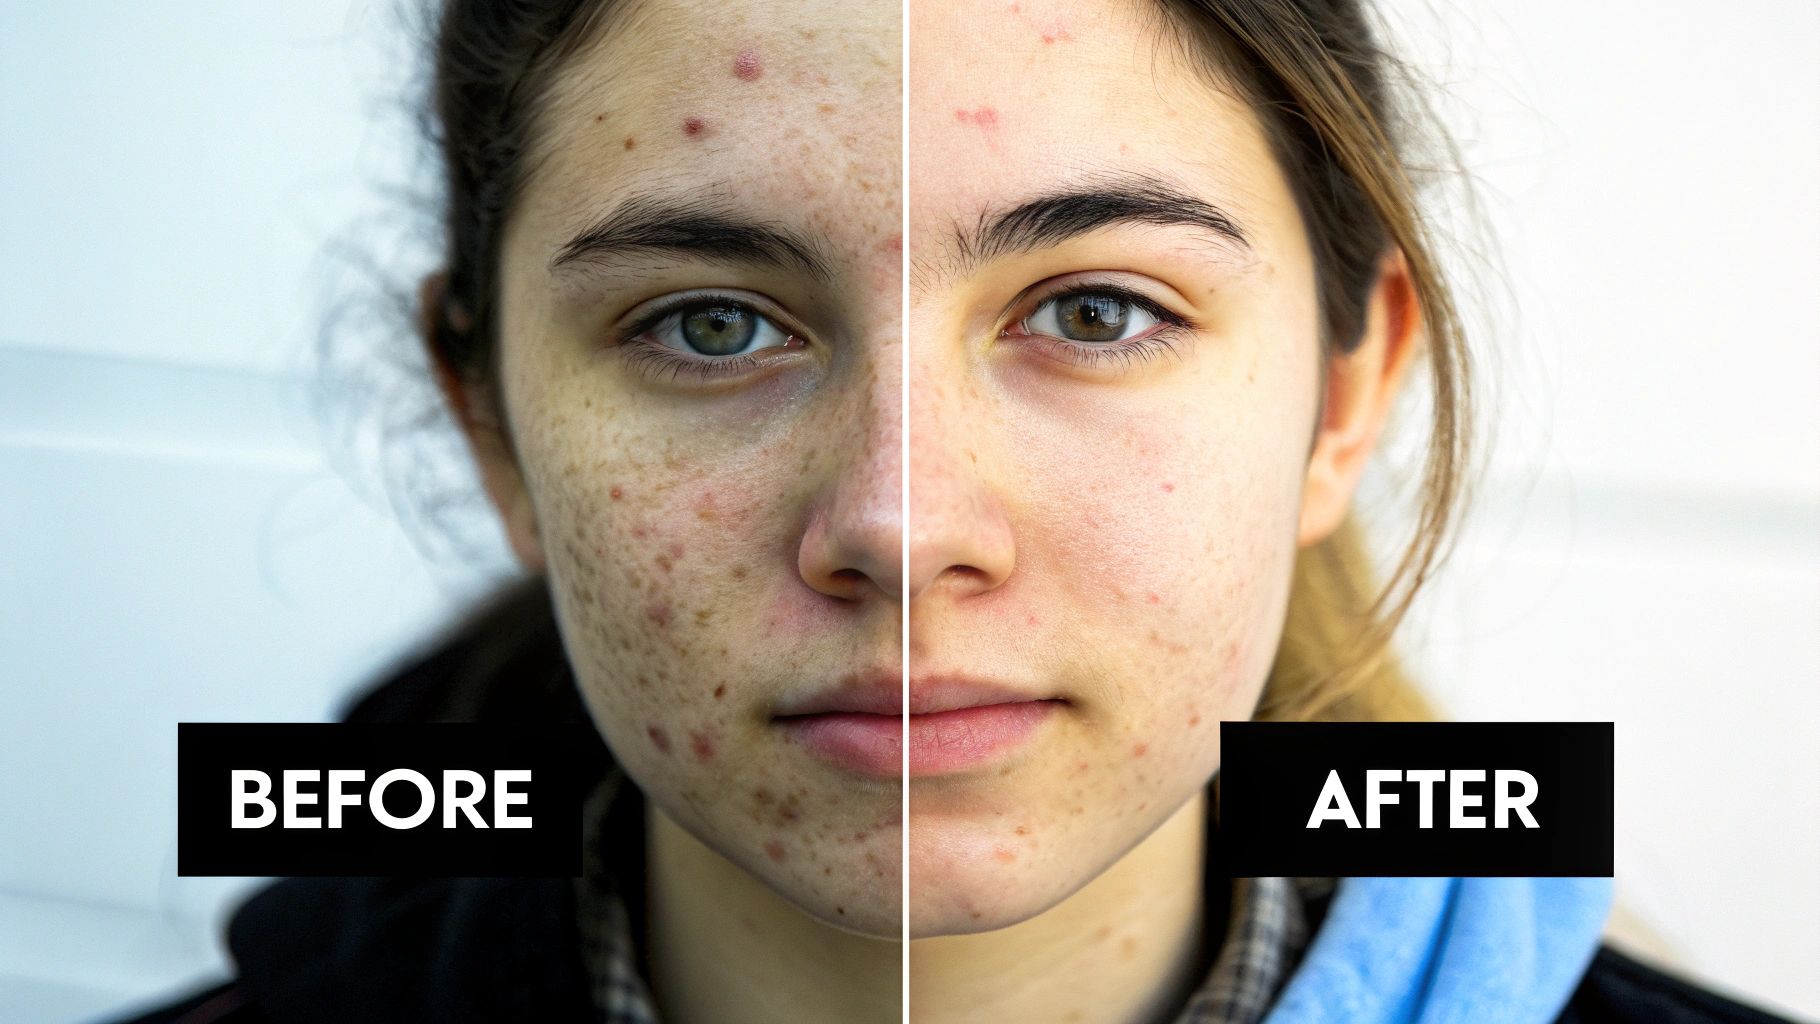
Seeing is Believing: Real Before and After Results
When it comes to a glycolic acid peel before after transformation, nothing tells the story quite like a picture. The visual proof can be genuinely compelling, but it's important to know what you're looking at to set realistic expectations for your own skin.
Changes might seem subtle after just one peel, but they build on each other over a series of treatments. It’s not just about getting an overall "glow"; it’s about spotting the real, tangible improvements in texture, tone, and clarity. By looking at how glycolic acid works on different skin concerns, you can truly appreciate its power to rejuvenate the skin from multiple angles.
Spotting the Improvements: Fine Lines and Texture
Smoother skin is at the top of most people's wish lists, and this is where glycolic acid really delivers. Before a peel, you might notice that fine lines, especially around the eyes and mouth, look more defined. The skin's surface can also feel a bit rough or look uneven in texture.
After a few treatments, you'll see a definite softening of these lines. Glycolic acid gets to work deep down, kick-starting collagen production, which plumps up the skin from within and makes those creases less noticeable. The overall texture becomes more refined, pores often look smaller, and your skin will feel dramatically softer to the touch.
This textural change is the secret behind that post-peel glow. When you slough off the rough, dead cells that scatter light, the fresh new skin underneath can reflect it evenly. That’s what creates that natural, healthy luminosity.
Fading Hyperpigmentation and Acne Scars
From stubborn sunspots to the dark marks acne leaves behind, hyperpigmentation is a common frustration. A glycolic peel tackles this head-on by speeding up cell turnover, which basically fast-tracks the process of shedding those discoloured surface cells.
Before starting a course of peels, these spots can look dark and seem like they're here to stay. But the "after" photos tell a different story, revealing a clear fading and breaking up of that concentrated pigment. While a single peel won't completely erase a dark spot, a consistent series can lead to a much more even, uniform complexion, making past breakouts and sun damage a distant memory.
How Strength and Sessions Affect Your Results
The scale of your glycolic acid peel before after results really comes down to two things: the strength of the acid and the number of sessions you have. A single, low-strength at-home peel might give you a nice, temporary brightness, but it won’t create the same kind of lasting structural change as a professional course of treatments.
To get a better sense of what's possible, it's always helpful to look at a variety of beauty transformation visuals. Seeing different outcomes can help you align your goals with what's realistically achievable on your own journey.
The peel's concentration is a massive factor, as each level is designed for a different purpose. It's crucial to match the strength to your skin's needs and tolerance.
Choosing the Right Glycolic Acid Concentration
| Concentration Range | Best For | Typical Application | Expected Sensation |
|---|---|---|---|
| 5-15% | Brightening, gentle exfoliation. | At-home products (toners, serums). | Mild tingle, if any. |
| 20-30% | Mild fine lines, uneven tone. | Entry-level professional or advanced home use. | Noticeable tingling, warmth. |
| 40-50% | Moderate sun damage, acne scars. | Professional clinic setting only. | Strong tingling, "spicy" feeling. |
| 60-70% | Deeper lines, significant pigmentation. | Dermatologist or experienced aesthetician only. | Intense warmth, requires monitoring. |
Ultimately, a truly impressive transformation is a marathon, not a sprint. The winning formula is consistency—a well-planned series of professional peels combined with disciplined aftercare. That's how you achieve those lasting, wow-worthy before-and-after results.
Understanding the Risks and Who Should Avoid Peels
As impressive as the 'before and after' photos can be, it's crucial to remember that a glycolic acid peel isn't the right choice for everyone. A good decision is an informed one, which means having a clear-eyed view of the potential downsides and knowing when to simply say no. This isn't about scaremongering; it's about respecting your skin and making sure this treatment is a safe, positive step for you.
Most of what you'll experience post-peel is temporary and a totally normal part of the healing process. Think of it as the expected soreness after a really effective workout for your skin. Knowing what's coming means you won't panic when it happens.
Common and Temporary Side Effects
Straight after a peel, your skin will be in a reactive phase. Expect to see some of the following, which should all calm down within a few days to a week as your skin gets back on its feet:
- Redness and Flushing: For the first 24-48 hours, your skin will likely look and feel like it has a mild sunburn. This is by far the most common reaction and just shows that the skin's renewal process has kicked off.
- Dryness and Tightness: As the old, top layer gets ready to make its exit, your skin will probably feel quite tight and parched. This is your signal to be generous with gentle, nourishing moisturisers.
- Sensitivity: That fresh, new skin is going to be more delicate. It'll be more sensitive to touch, temperature, and even the other products in your routine, so handle with care.
- Light Peeling or Flaking: This is actually the goal! The shedding is what reveals the brighter, smoother skin hiding underneath.
Seeing these reactions means the peel is doing its job. But there are times when the risks are a bit more serious.
Serious Risks and Contraindications
More severe issues are rare, but they can happen. They usually stem from not following aftercare instructions properly or getting a peel when your skin wasn't in a good state for it in the first place. This can lead to burns, scarring, or even post-inflammatory hyperpigmentation (dark patches), which is a real risk if you're not militant about sunscreen.
To keep yourself safe, it's essential to know who should steer clear of peels. You should avoid this treatment if any of these apply to you:
- Active Skin Infections: This means things like cold sores (herpes simplex), warts, or any bacterial infections on your face. A peel could easily make them spread.
- Certain Skin Conditions: If you have active rosacea, eczema, or psoriasis in the area you want to treat, a peel could make the inflammation much, much worse.
- Pregnancy or Breastfeeding: Hormonal fluctuations can mess with skin sensitivity and pigmentation, so it's generally recommended to wait until after this period.
- Recent Use of Certain Medications: If you’ve taken isotretinoin (Accutane) within the last six months, your skin won't heal in the same way, making a peel unsafe.
Your skin's health always comes first. If you have even the slightest doubt, the best and safest thing to do is talk to a dermatologist. They can assess your skin properly and guide you through the various cosmetic-grade peels available. For a deeper look into the different treatments out there, you can explore the ultimate guide to cosmetic-grade peels.
Got Questions About Glycolic Peels? Let's Get Them Answered
Even after getting the full rundown, it's completely normal to have a few questions buzzing around in your head. Let's tackle some of the most common ones I hear from clients, so you can feel completely ready for your own glycolic acid peel before after experience.
Think of this as your personal FAQ. We'll clear up any last-minute wobbles and make sure you walk into your appointment feeling confident and excited.
How Many Glycolic Peels Will I Actually Need?
You'll almost certainly walk out of your first appointment with a noticeably brighter and smoother complexion, which is a fantastic immediate boost. But the real, lasting changes—the kind that tackle stubborn texture, uneven tone, and fine lines—come from being consistent. For that, you’re typically looking at a series of four to six peels.
We usually schedule these sessions about two to four weeks apart. This rhythm isn't random; it gives the glycolic acid a chance to work its magic progressively, getting a little deeper each time and building on the last session's success. It’s this steady, cumulative effect that delivers that 'wow' transformation.
Can I Just Do a Glycolic Acid Peel at Home?
You absolutely can, but it’s crucial to know what you’re getting. At-home glycolic peels are designed for safety, so they use much lower concentrations—usually under 20%. They are brilliant for keeping your skin looking fresh and glowy between professional treatments, acting as a great maintenance tool.
However, if you're aiming to address more significant concerns like deep-seated hyperpigmentation, prominent fine lines, or noticeable acne scarring, an at-home product simply won't have the power. Professional peels, which can range from 20% to 70%, are formulated to create a much more substantial change. For a genuine transformation, the clinic is the way to go.
Key Takeaway: Think of at-home peels for maintenance and professional peels for a major reset. And please, always patch test a new at-home product and follow the instructions to the letter to avoid unhappy skin.
Is a Glycolic Acid Peel Painful?
Most people wouldn't describe it as "painful." The feeling is more of an active, tingly sensation. Some call it itchy, others a bit warm or even "spicy"—it's that feeling you get when you know something is working.
This sensation only lasts for the few minutes the peel is active on your skin. As soon as your practitioner neutralises it, the feeling vanishes almost instantly. They'll be checking in with you the whole time to make sure you're comfortable.
When’s the Best Time of Year for a Peel?
If there's an ideal "peel season," it's definitely autumn and winter. The sun is less intense and the days are shorter, which lowers the risk of sun damage or triggering hyperpigmentation while your skin is in its delicate, freshly-revealed state.
That said, your post-peel care is non-negotiable, no matter the season. A broad-spectrum SPF 30 or higher is your new best friend every single day. Protecting your skin from UV rays is the single most important thing you can do to protect your investment and keep your results looking incredible.
At Avera Cosmetic, we're passionate about providing professional-grade skincare to help you achieve radiant, healthy skin. To protect and get the most out of your results, explore our range of gentle and effective post-peel care products. Find the perfect formulas for your skin at https://averacosmetic.com.